Monthly Archives: เมษายน 2011

ลง Windows XP SP3 2011 สำหรับซ่อมและอัปเกรด

** ปัญหา ลง วินโดว์ไม่ได้ จอฟ้า ไม่เห็นฮาร์ดดิส เกิดจาก ไฟล์ติดตั้งวินโดว์รุ่นที่ท่านกำลังใช้ติดตั้งบน SATA AHCI MODE เครื่องนั้นๆ ไม่มีไดร์เวอร์สนับสนุน จึงต้องปรับไปใช้ ATA/IDE เพื่อให้ติดตั้งได้ ซึ่งการติดตั้งที่เน้นประสิทธิภาพจำเป็นใช้แผ่นติดตั้งรุ่นใหม่กว่า โดยไม่ต้องปรับค่าหรืออัปเกรด ดาวเกรดไบออสใดๆ ทั้งสิ้น ใช้ได้ทุกรุ่น ทั้งพีซีตั้งโต๊ะ และโน๊ตบุ๊ค**

ขั้นตอนเหมือนการลงในแผ่นติดตั้งมาตรฐานทั่วไป ในช่วงการเลือกรูปแบบการติดตั้ง

สำหรับผู้ที่ไม่เคยใช้งานในการติดตั้งลักษณะนี้มาก่อนให้อ่านในหัวข้อ การลงวินโดว์ซ่อมและอัปเกรดแบบไม่ต้องลบทิ้ง ก่อนนะครับ

จะมีเปลี่ยนแปลงจากที่เคยทดสอบก่อนหน้านี้ อยู่ไม่มากนะครับ

– รองรับการทำงาน SATA3

– ตรวจเช็คและติดตั้งไดร์เวอร์เหมือนเวอร์ชั่นลงใหม่

– การควบคุมการติดตั้งแบบกึ่งอัตโนมัติ


รองรับการติดตั้งบนชิฟเก่าใหม่แบบครอบคลุม มีชิฟ Nvidia บางรุ่นที่ไดร์เวอร์ในชุดนี้ไม่สามารถติดตั้งได้ จากการทำสอบและปรับแต่งแล้วก็ยังไม่ได้ ส่วนค่ายอื่นๆทำงานได้ถูกต้อง และบางรุ่นยังไม่ได้ทำการทดสอบ

ตัวอย่าง

AMD AHCI Compatible RAID 6xx

AMD AHCI Compatible RAID 7xx

AMD AHCI Compatible RAID

ALi/ULi M5228 ATA/RAID

ALi/ULi M5281/M5283 SATA/RAID

Compaq HP ProLiant SCSI

Dell CERC SATA 1.5/6ch

Dell PERC 5i/6i (W2K)

Dell PERC 2, 2/Si, 3/Si, 3/Di (W2K/W2K3)

IBM ServeRAID 8e SAS Adaptec 94xx

Intel 82801ER/6300ESB SATA RAID

Intel ESB/ESB2/ICH6/ICH7 SATA AHCI/RAID

Intel ICH8/ICH9/EP 80579 SATA AHCI/RAID

Intel ICH9/ICH10 SATA AHCI/RAID

JMicron JMB36X RAID

Marvell 61xx RAID

Marvell RAID 614x SATA2

Marvell Serial ATA PCI-X

Marvell 64xx/63xx SAS

Marvell 91xx AHCI SATA

NVIDIA nForce 2/3/4

ULi M1573 SATA/RAID

ULi M1575/M1697 SATA/RAID

ULi M1689/M1567 SATA/RAID

Silicon Image SATARaid

SIS 180/181 RAID

SIS 1182 RAID

SIS 1184 RAID/AHCI & 1185 AHCI

SIS 5513/5518 IDE UDMA

VIA RAID

VIA ATA/ATAPI

VIA StorX IDE

VIA SATA/PATA IDE


สำหรับชิฟหลักๆในปัจจุบันก็ใช้ Windows Xp SP3 2011 ติดตั้งได้ครอบคลุมทั้งหมดพอสมควรแล้ว ส่วนเวอร์ชั่น Windows XP Repair and Upgrade จะเป็นการรวมทั้งเก่าและใหม่เพื่อให้ครอบคลุมงานซ่อมและอัปเกรดมากยิ่งขึ้นและตัดการอัปเดตระหว่างติดตั้งบางส่วนเพื่อลดการซ้ำซ้อนของโปรแกรมที่มีอยู่เดิม


## การปรับโหมดการทำงานของ SATA จาก AHCI –> ATA/IDE/Compatible.. เป็นการปรับให้ทำงานเสมือนมาตรฐานเก่าดั้งเดิมบนพอร์ต SATA ซึ่งอาจจะด้อยประสิทธิภาพและขาดคุณสมบัติใหม่ของพอร์ต SATA อีกทั้งเพื่อลดปัญหากลุ่มผู้ใช้งานที่ติดตั้งไม่ได้ให้สามารถติดตั้งผ่านไปได้ ##

การแชร์ไฟล์สองเครื่องร่วมกันแบบใช้สายแลนเพียงเส้นเดียว

การแชร์ไฟล์ระหว่างสองเครื่อง PC&PC/ PC&Notebook/Notebook&Notebook โดยใช้สายแลนเพียงเส้นเดียว

การปรับแต่งใช้งาน ก็ไม่ยุ่งยากเท่าไรนัก ถ้าระบบปฏิบัติการของคุณไม่ทำงานบกพร่องหรือมีไวรัสก่อกวน

ใช้สำหรับแลกเปลี่ยนไฟล์ระหว่างกัน (สองเครื่องเท่านั้น) สามารถใช้ตามบ้าน ออฟฟิตเล็กๆ เพื่อแชร์งาน แชร์ปริ้นเตอร์ หรือใช้โปรแกรมร่วมกันทางเครือข่าย รวมทั้งการเล่นเกมด้วย

การเตรียมความพร้อมก่อนการติดตั้ง จำเป็นต้องมีสายแลนแบบหัวทั้งสองข้างสายไขว้กัน ไม่ใช่สายแลนตรงตามท้องตลาดทั่วไปนะครับ


เมื่อขั้นเตรียมการพร้อมแล้ว ให้เริ่มการปรับแต่งสักเล็กน้อย เพื่อลดปัญหาในการประยุกต์ใช้งาน

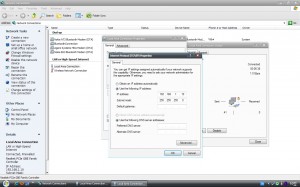
เรียก My Network Place ขึนมาทำการปรับแต่ง (ตัวอย่างการปรับแต่งระหว่าง Windows xp 2010 AHCI กับ Windows xp 2010 OEM)


Properties ของ Lan ค่าปกติจะเป็นการเชื่อมต่อและรับค่าอัตโนมัติ ต้องทำการปรับค่าให้เป็นแบบเลือกเอง

ใส่หมายเลขในกลุ่มเดียวกันแต่ให้ตัวเลขชุดสุดท้ายคนละเลขกัน ปรับแต่งแก้ไขทั้งสองเครื่อง ในตัวอย่างใช้ เลข 10 และ 11

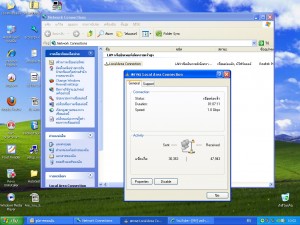
เมื่อเช็คสถานะการเชื่อมต่อ ดูเหมือนจะใช้งานได้แล้ว แต่ให้สังเกตค่าตัวเลขในการรับส่งข้อมูลว่าขยับทั้งส่งและรับหรือไม่ ปกติแล้วจะยังไม่สามารถรับส่งได้ ในขั้นตอนนี้

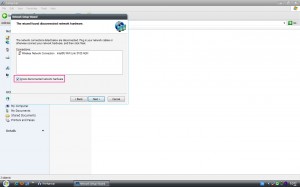
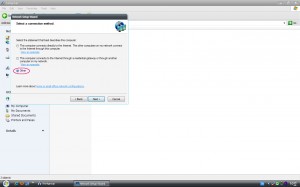
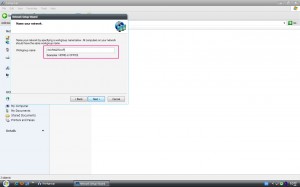
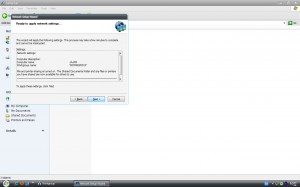
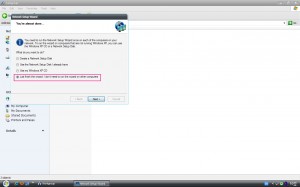
หลังจากปรับเลขหมายประจำเครื่องเรียบร้อยแล้ว ให้ทำการเรียก Network Setup Wizad ขึ้นมาปรับแต่งและเปิดการใช้งาน (ปรับแต่งทั้งสองเครื่อง)


เมื่อดำเนินการปรับแต่ง ตามตัวอย่างโดยไม่พบปัญหาแสดงผิดพลาดใดๆ จะสามารถเรียกใช้งานผ่านเครื่องทั้งสองได้

หลังจากปรับแต่งแล้ว สามารถเรียกแสดงเวิร์คกรุ๊ปที่ใช้งานร่วมกันได้ ตามตัวอย่างจะแสดง 2 เครื่องที่เชื่อมต่อกันอยู๋

เมื่อเข้าไปยังเครื่องจะพบแฟ้มเริ่มต้นในการแชร์ (ผู้ใช้สามารถแชร์แฟ้มหรือไฟล์อื่นๆเพิ่มเติมตามต้องการ)

เอกสารอ้างอิง

Crossed and Straight cables – when to use them

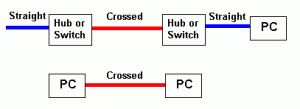
The following diagram shows the Normal use of Crossed and Straight cables (see also the notes below).

Notes:

  1. We show Straight cables as BLUE and Crossed as RED. That is our convention. The cable color can be anything you choose or, more likely, the vendor decides.
  2. To avoid the need for Crossed cables many vendors provide UPLINK ports on Hubs or Switches – these are specially designed to allow the use of a STRAIGHT cable when connecting back-to-back Hubs or Switches. Read the manufacturers documentation carefully.
  3. Increasingly vendor hubs (can you still buy them) and switches will auto-detect the connection type and internally switch the connectors so that STRAIGHT cables can be used everywhere.

Standards Summary

The various standards can get a tad complicated and messy. We get occasional email requesting a summary of the standards – this is our attempt to provide a quick overview.


Standard Required Pairs 10M 100M 1000M 10G Cable Notes
10base-T 2 (1/2 and 3/6) yes yes no no cat 5, 5e, 6 100m support only if no cat 3/4 in run
100base-TX 2 (1/2 and 3/6) yes yes no no cat 5, 5e, 6 100m support only if no cat 3/4 in run
100base-T4 4 (1/2, 3/6, 4/5 and 7/8) yes yes yes yes cat 3, 4, 5, 5e, 6 max of 100m if cat 3 or 4 in network
1000base-T 4 (1/2, 3/6, 4/5 and 7/8) yes yes yes yes cat 5e, 6 Functionally identical to 100base-T4. Some cat cables may be acceptable.
10Gbase-T 4 (1/2, 3/6, 4/5 and 7/8) yes yes yes yes cat 6a cat 6 cables may be used but have distance limitation.


Category 5(e) (UTP) colour coding table แบบตรงทั่วไป

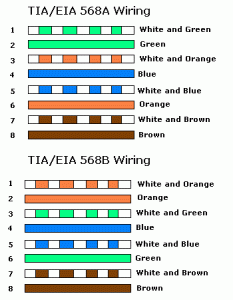
The following table shows the normal colour coding for category 5 cables (4 pair) based on the two standards supported by TIA/EIA (see also our primer on this topic)

We get occasional email about the difference between 568A and 568B wiring. Which one you use is a matter of local decision. These standards apply to the color code used within any SINGLE cable run – BOTH ENDS MUST USE THE SAME STANDARD. However, since they both use the same pinout at the connectors you can mix 568A and 568B cables in any installation.

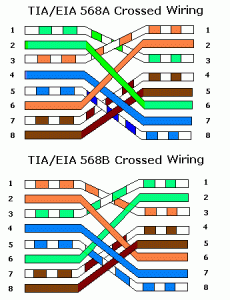
10baseT Crossed cable (PC to PC or HUB to HUB) แบบไขว้

Crossed cables are used to connect PCs to one other PC or to connect a HUB to a HUB. Crossed cables are sometimes called Crossover, Patch or Jumper cables. If your connection is PC to HUB you MUST use a Straight cable.

The following description shows the wiring at both ends (male RJ45 connectors) of the crossed cable.

One end
RJ45 Male
Other end
RJ45 Male
1 3
2 6
3 1
4 * 5 *
5 * 4 *
6 2
7 * 8 *
8 * 7 *


NOTES:

  1. Items marked * are not necessary for 10M LANs but since you will be moving shortly to 100MB or Gigabit LANs (won’t you) you will save yourself a LOT OF TIME finding crappy cable (that you made) that does not work. Instead we suggest you wire to 100BaseT standards.
  2. We use RED for crossed cables (or more commonly now a red heat-shrink collar at each end).
  3. All our crossed wiring is done to the 100base-T4 spec which you can use with 10baseT networks – but NOT always the other way around.

10baseT Straight Cable (PC to HUB/SWITCH) แบบตรงทั่วไป

Straight cables are used to connect PCs or other equipment to a HUB or Switch. If your connection is PC to PC or HUB to HUB you MAY need to use a Crossed cable with older equipment. Most modern Hubs and Switches provide auto-sensing which means a straight cable can always be used.

The following cable description is for the wiring of both ends (RJ45 Male connectors) with the 568B category 5(e) wiring colors you could, of course, use the 568A colour scheme.


Pin No. strand color Name
1 white and orange TX+
2 orange TX-
3 white and green RX+
4 NC *
5 NC *
6 green RX-
7 NC *
8 NC *


NOTE: Items marked * are not necessary for 10M LANs (10base-T) but since you will be moving shortly to 100MB or Gigabit LANs (won’t you) you will save yourself a LOT OF TIME finding crappy cable (that you made) that does not work. Instead we suggest you wire to 100Base-T4 standards. After all you gotta stick the ends somewhere man.

We use BLUE for 10base-T straight cables. NOTE: All our wiring is now done to the 100base-T4 spec which you can use with 10base-T networks – but NOT necessarily the other way around.


100base-T Straight Cable (PC to HUB/SWITCH) แบบตรงทั่วไป

Straight cables are used to connect PCs or other equipment to a HUB or Switch. If your connection is PC to PC or HUB to HUB you MAY need to use a Crossed cable with older equipment. Most modern Hubs and Switches provide auto-sensing which means a straight cable can always be used.

The following cable description is for the wiring of BOTH ends (RJ45 Male connectors) with your category 5 wiring colors (TIA/EIA 568A or 568B though the example uses 568B colors).

Pin No. conductor color Name
1 white and orange TX_D1+
2 orange TX_D1-
3 white and green RX_D2+
4 blue BI_D3+ **
5 white and blue BI_D3- **
6 green RX_D2-
7 white and brown BI_D4+ **
8 brown BI_D4- **


We use BLUE for 100baseT straight cables.

NOTES:

  1. Wires marked ** are ABSOLUTELY NECESSARY for 100Base-T4 networks – used when any combination of category 3/4/5 cables are present, when using 1000base-T (GigE) and MAY be required for Power-over-Ethernet (PoE) – see below.
  2. Wires marked ** are not essential for 100Base-TX (using cat 5/5e6/6a ONLY cables) and CAN be used for other purposes, for example, telephony but, .. beware .. read this FAQ and our LAN plus Telephony article before you wire your entire neighbourhood for surround sound.
  3. The Power-over-Ethernet spec (802.3af) allows three schemes where power may be supplied. Two of these schemes use pairs 4,5 and 7,8 (marked ** in above table) for power (called Midspan PSE and Alternative B or Mode B), one scheme uses ONLY pairs 1,2 and 3,6 (Endpoint PSE, Alternative A or Mode A) for both signals and power. Depending on which scheme you use pairs 4,5 and 7,8 may be required. See Power over Ethernet (PoE).
  4. Gigabit Ethernet requires all 4 pairs (8 conductors).
  5. All our wiring is now done to the 100base-T4 spec which you can use with 1000base-T and even 10baseT networks – but NOT the other way around.


100base-T Crossed cable (PC to PC or HUB to HUB) แบบไขว้

Crossed cables are used to connect PCs to one other PC or to connect a HUB to a HUB. Crossed cable are sometimes called Crossover, Patch or Jumper cables. If your connection is PC to HUB you MUST use a Straight cable. Most modern Hubs and Switches provide auto-sensing which means a straight cable can always be used.

The following description shows the wiring at both ends (male RJ45 connectors) of the crossed cable. Note: The diagrams below shows crossing of all 4 pairs and allows for the use of cat3/4 cables with 100m LANs (100base-T4). Pairs 4,5 and 7,8 do not NEED to be crossed in 100base-TX wiring. See notes below.

We use RED for crossed cables (or more commonly now a red heat-shrink collar at each end).

NOTES:

  1. All our crossed wiring is now done to the 100base-T4 spec (uses all 4 pairs, 8 conductors) which you can use with 1000base-T and even 10base-T networks – but NOT necessarily the other way around.
  2. Many commercial 100m LAN patch cables seem not to cross pairs 4,5 and 7,8. If there is no cat3/4 wiring in the network this perfectly acceptable.
  3. Gigabit Ethernet uses all 4 pairs so requires the full 4 pair (8 conductor) cross configuration (shown above).
  4. If you are using Power-over-Ethernet (802.3af) then Mode A or Alternative A uses pairs 1,2 and 3,6 for both signals and power. Mode B or alternative B uses 4,5 and 7,8 to carry power. In all cases the spec calls for polarity insensitive implementation (using a diode bridge) and therefore crossing or not crossing pairs 4,5 and 7,8 will have no effect. See Power over Ethernet (PoE).


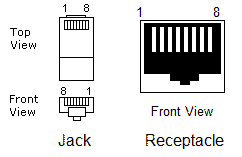
RJ45 Connector (Jack and Receptacle) Pin Numbering

RJ45 Male Connector (Jack) and Female Connector (Receptacle)

Notes:

  1. The male connector is more normally called a jack and the female connector a receptacle.
  2. While most commonly referred as an RJ45, it is a modular connector with the catchy name of 8P8C.
  3. The receptacle numbering is shown using a FRONT view (left to right, pin 1 – 8). Beware however, receptacles are wired from the REAR and hence the numbering will be inverted. Viewed from the REAR the numbering will be left to right, pin 8 – 1.

ขอขอบคุณ

สาคอมพิวเตอร์

การลง XP ซ่อมและอัปเกรดแบบไม่ต้องลบทิ้ง

Windows XP SATA AHCI 2012 Repair&Upgrade Edition เป็นเวอร์ชั่นแก้ไขเพิ่มเติมจากการลงวินโดว์แบบปกติทั่วไปให้ได้นำไปเป็นแนวทางประยุกต์ใช้งานจริง

***ควรสำรองไฟล์สำคัญของระบบไว้ก่อน แฟ้มและไฟล์จะไม่ถูกลบ รวมทั้งไวรัสและไฟล์ขยะด้วย (ถ้ามี) ฮิฮิ ***

เหมาะสำหรับ

– เครื่องที่ต้องการฟื้นฟูระบบวินโดว์ที่เสียหาย

– เครื่องที่บู๊ตเข้าไม่ได้ จอฟ้า ติดไวรัส

– เครื่องที่เวอร์ชั่นเก่าล้าสมัย

– เครื่องที่จำเป็นต้องใช้โปรแกรมเฉพาะทาง ที่ไม่สามารถหาใหม่ได้..

– เครื่องที่ต้องการอัปเกรดในโหมดการทำงานบน SATA AHCI

ทั้งนี้ความสมบูรณ์ของการติดตั้งประเภทนี้ ขึ้นอยู่กับระดับความเสียหายและสาเหตุของความเสียหายด้วย ซึ่งไม่รวมถึงความเสียหายจากอุปกรณ์(ฮาร์ดดิส แรม บอร์ด เป็นต้น)

การปรับแต่งระหว่างติดตั้ง เป็นแบบกึ่งอัตโนมัติ คือใช้การควบคุมเองบ้างในการติดตั้งแต่ละขั้นตอน ที่เหลือจะอัตโนมัติทั้งหมด

เริ่มบู๊ตจากแผ่นติดตั้ง

เริมโหลดแฟ้มติดตั้ง เหมือนเดิม

ขั้นตอนโหลดไดร์เวอร์ควบคุมฮาร์ดดิสจะใช้เวลานานสักหน่อยจากเวอร์ชั่นเดิมๆ เนื่องด้วยมีไดร์เวอร์ SATA AHCI รวมอยู่ด้วย

แสดงหน้าต่างโต้ตอบ และบอกรายละเอียดดังนี้

– กด Enter เพื่อทำการติดตั้งวินโดว์เอ็กพี

– กด R เพื่อซ่อมวินโดว์โดยใช้การคืนค่าผ่านคอนโซน (ผู้เขียนทดสอบแล้ว ไม่สำเร็จ หรือใช้ไม่เป็นนะครับ)

– กด F3 เพื่อออกจากการติดตั้งนี้

ในขั้นตอนนี้ ให้เลือกกด Enter นะครับ เพื่อทำต่อในลำดับต่อไป

เงื่อนไขการใช้งาน กด F8 เพื่อยอมรับและดำเนินการต่อ

ตรวจเช็คหาวินโดว์ตัวเดิมในฮาร์ดดิส กรณีแฟ้มเสียหายในส่วนค่านี้จะไม่สามารถเรียกหาระบบวินโดว์ตัวเดิมได้ ต้องใช้วิธีแก้ไขข้ันสูงกว่า

ตรวจพบวินโดว์ตัวเดิม จะแสดงชื่อรุ่นที่พบ ตัวอย่างคือ Microsoft Windows XP Professinal  ในขั้นตอนนี้ให้กดปุ่ม R เพื่อเริ่มซ่อมหรืออัปเกรดวินโดว์ตัวเก่า

ตรวจเช็คไดร์ C: ที่ติดตั้งไว้ กรณีพบปัญหาจะหยุดในขั้นตอนนี้

เริ่มคัดลอกไฟล์ติดตั้ง

เริ่มเข้าสู่กระบวนการติดตั้งซ่อมอัปเกรด โดยมีการโหลดไดร์เวอร์ให้อัตโนมัติ เหมือนในรุ่น 2010-2011 ที่เคยกล่าวมา


ดำเนินการปรับปรุงระบบ ปรับแต่งค่าอัตโนมัติ

กรอบแจ้งเตือนไม่พบไฟล์โปรแกรม ที่ช่วยลบแฟ้มไดร์เวอร์ชั่วคราว คลิ๊ก OK แล้วให้ดำเนินการลบด้วยตัวเอง

แฟ้มไดร์เวอร์ที่อาจจะต้องทำการลบออกเองหลังโหลดเข้า Windows ในครั้งแรกหลังอัปเกรด ซ่อม เสร็จ ให้เลือกดังตัวอย่าง แล้วทำการลบทิ้งได้เลย


แฟ้มที่ใช้งานของ Windows xp มีเท่านี้ สำหรับเครื่องผู้ใช้อาจมีการสร้างโฟลเดอร์อื่นๆ อีกก็ให้คงไว้ตามต้องการ


รีบู๊ตใหม่และตรวจเช็คโปรแกรมและไดร์เวอร์ต่างๆ

แสดงหน้า Logon Screen Style XP8-2012 v12.03


ขอขอบคุณ

สาคอมพิวเตอร์